The simplest way is as an expression in a debugger. You can change debug expressions without recompiling, and you can wait to decide what to write until you have seen the running objects. You can also write test expressions as statements which print to the standard output stream. Both styles of tests are limited because they require human judgment to analyze their results. Also, they don't compose nicely- you can only execute one debug expression at a time and a program with too many print statements causes the dreaded "Scroll Blindness".
JUnit tests do not require human judgment to interpret, and it is easy to run many of them at the same time. When you need to test something, here is what you do:
public void testSimpleAdd() {
    Money m12CHF= new Money(12, "CHF");
    Money m14CHF= new Money(14, "CHF");
    Money expected= new Money(26, "CHF");
    Money result= m12CHF.add(m14CHF);
    assert(expected.equals(result));
}
If you want to write a test similar to one you have already written, write
a Fixture instead. When you want to run more than one test, create a Suite.
Tests need to run against the background of a known set of objects. This set of objects is called a test fixture. When you are writing tests you will often find that you spend more time writing the code to set up the fixture than you do in actually testing values.
To some extent, you can make writing the fixture code easier by paying careful attention to the constructors you write. However, a much bigger savings comes from sharing fixture code. Often, you will be able to use the same fixture for several different tests. Each case will send slightly different messages or parameters to the fixture and will check for different results.
When you have a common fixture, here is what you do:
public class MoneyTest extends TestCase {
    private Money f12CHF;
    private Money f14CHF;
    private Money f28USD;

    protected void setUp() {
        f12CHF= new Money(12, "CHF");
        f14CHF= new Money(14, "CHF");
        f28USD= new Money(28, "USD");
    }
}
Once you have the Fixture in place, you can write as many Test Cases as
you'd like.
Writing a test case without a fixture is simple- override runTest in an anonymous subclass of TestCase. You write test cases for a Fixture the same way, by making a subclass of TestCase for your set up code and then making anonymous subclasses for the individual test cases. However, after a few such tests you would notice that a large percentage of your lines of code are sacrificed to syntax.
JUnit provides a more concise way to write a test against a Fixture. Here is what you do:
public void testMoneyMoneyBag() {
    // [12 CHF] + [14 CHF] + [28 USD] == {[26 CHF][28 USD]}
    Money bag[]= { f26CHF, f28USD };
    MoneyBag expected= new MoneyBag(bag);
    assertEquals(expected, f12CHF.add(f28USD.add(f14CHF)));
}
Create an instance of of MoneyTest that will run this test case like this:
new MoneyTest("testMoneyMoneyBag")
When the test is run, the name of the test is used to look up the method
to run.
Once you have several tests, organize them into a Suite.
As soon as you have two tests, you'll want to run them together. You could run the tests one at a time yourself, but you would quickly grow tired of that. Instead, JUnit provides an object, TestSuite which runs any number of test cases together.
For example, to run a single test case, you execute:
TestResult result= (new MoneyTest("testMoneyMoneyBag")).run();
To create a suite of two test cases and run them together, execute:
TestSuite suite= new TestSuite();
suite.addTest(new MoneyTest("testMoneyEquals"));
suite.addTest(new MoneyTest("testSimpleAdd"));
TestResult result= suite.run();
Another way is to let JUnit extract a suite from a TestCase. To do so you
pass the class of your TestCase to the
TestSuite suite= new TestSuite(MoneyTest.class);
TestResult result= suite.run();
Use the manual way when you want a suite to only contain a subset of the test cases. Otherwise the automatic suite extraction is the preferred way. It avoids you having to update the suite creation code when you add a new test case.
TestSuites don't only have to contain TestCases. They contain any object that implements the Test interface. For example, you can create a TestSuite in your code and I can create one in mine, and we can run them together by creating a TestSuite that contains both:
TestSuite suite= new TestSuite();
suite.addTest(Kent.suite());
suite.addTest(Erich.suite());
TestResult result= suite.run();
Once you have a test suite, you'll want to run it. JUnit provides tools
to define the suite to be run and to display its results. You make your
suite accessible to a TestRunner tool with a static method suite
that returns a test suite.
For example, to make a MoneyTest suite available to a TestRunner, add
the following code to MoneyTest:
public static Test suite() {
    TestSuite suite= new TestSuite();
    suite.addTest(new MoneyTest("testMoneyEquals"));
    suite.addTest(new MoneyTest("testSimpleAdd"));
    return suite;
}
If a TestCase class doesn't define a suite method a TestRunner will extract
a suite and fill it with all the methods starting with "test".
JUnit provides both a graphical and a textual version of a TestRunner tool. Start it by typing java junit.ui.TestRunner or junit.swingui.TestRunner. The graphical user interface presents a window with:
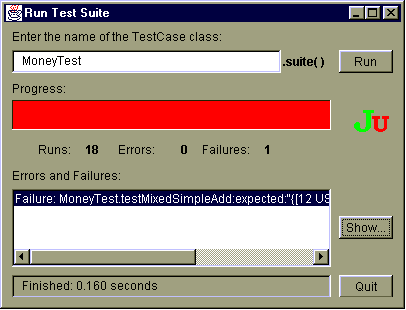
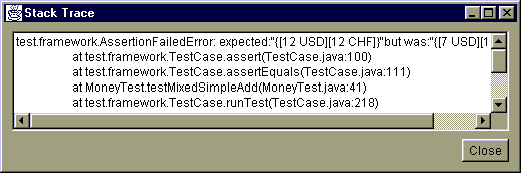
To find out more about a failure or an error select it in the list and press Show. This will show you a stack trace of the failure.
In a dynamic programming environment like VisualAge for Java which supports hot code update you can leave the JUnit window up all the time. In other environments you have to restart the graphical version for each run. This is tedious and time consuming. As an alternative JUnit provides junit.ui.LoadingTestRunner. This TestRunner reloads all your classes for each test run. Refer to the documentation of the TestCaseClassLoader for how to customize it.
There is a batch interface to JUnit, also. To use it typejava junit.textui.TestRunner followed by the name of the class with a suite method at an operating system prompt. The batch interface shows the result as text output. An alternative way to invoke the batch interface is to define a main method in your TestCase class.
For example, to start the batch TestRunner for MoneyTest, write:
public static void main(String args[]) {
    junit.textui.TestRunner.run(suite());
}
With this definition of main you can run your tests by simply typing java
MoneyTest at an operating system prompt.
For using either the graphical or the textual version make sure that
the junit.jar file is on your CLASSPATH.