
Fall Semester, 1998
Some Graphics
© 1998, All Rights Reserved, SDSU & Roger Whitney
San Diego State University -- This page last updated 21-Dec-98

|
CS 596 Java Programming Fall Semester, 1998 Some Graphics |
|
|---|---|---|
|
© 1998, All Rights Reserved, SDSU & Roger Whitney San Diego State University -- This page last updated 21-Dec-98 |
Graphics
The paint method has a graphics object as an argument
public void paint( Graphics display ) { display.drawString( "Constant" , 30, 40 ); }
The graphics class contains methods for drawing
Some Graphics Methods
| clearRect(int, int, int, int) | drawString(String, int, int) |
| clipRect(int, int, int, int) | fill3DRect(int, int, int, int, boolean) |
| copyArea(int, int, int, int, int, int) | fillArc(int, int, int, int, int, int) |
| create() | fillOval(int, int, int, int) |
| create(int, int, int, int) | fillPolygon(int[], int[], int) |
| dispose() | fillPolygon(Polygon) |
| draw3DRect(int, int, int, int, boolean) | fillRect(int, int, int, int) |
| drawArc(int, int, int, int, int, int) | fillRoundRect(int, int, int, int, int, int) |
| drawBytes(byte[], int, int, int, int) | finalize() |
| drawChars(char[], int, int, int, int) | getClipRect() |
| drawImage(Image, int, int, Color, ImageObserver) | getColor() |
| drawImage(Image, int, int, ImageObserver) | getFont() |
| drawImage(Image, int, int, int, int, Color, ImageObserver) | getFontMetrics() |
| drawImage(Image, int, int, int, int, ImageObserver) | getFontMetrics(Font) |
| drawLine(int, int, int, int) | setColor(Color) |
| drawOval(int, int, int, int) | setFont(Font) |
| drawPolygon(int[], int[], int) | setPaintMode() |
| drawPolygon(Polygon) | setXORMode(Color) |
| drawRect(int, int, int, int) | toString() |
| drawRoundRect(int, int, int, int, int, int) | translate(int, int) |
import java.awt.*;
class Drawing extends Frame {
public Drawing ( int WidthInPixels, int heightInPixels ) {
setTitle( "Drawing" );
setSize( WidthInPixels, heightInPixels );
setLocation( 40, 40);
setBackground( Color.green);
show();
}
public void paint( Graphics display ) {
display.setColor( Color.darkGray );
int x = 50; int y = 30;
int width = 40; int height = 40;
display.drawOval( x, y, width, height );
x = 100;
display.drawRect( x, y, width, height );
x = 150;
display.fillRect( x, y, width, height );
x = 200;
boolean raised = true;
display.draw3DRect( x, y, width, height, raised );
display.setColor( Color.red );
int x1 = 50; int y1 = 60;
int x2 = 200; int y2 = 60;
display.drawLine( x1, y1, x2, y2 );
Dimension size = getSize();
display.drawRect( 0, 0, size.width - 1, size.height -1 );
}
public static void main( String args[] ){
new Drawing( 300, 100 );
}
}
Output
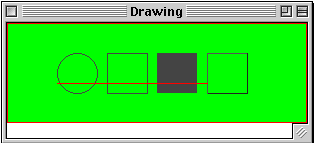
Drawing
Modes
Normal
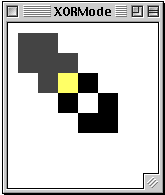
paint mode is to cover bits as you draw. In normal draw mode, drawing a red
line on a red area has no effect. In XOR mode, colors are toggled. There is a
current drawing color and an XOR color. If you draw over an area that is
already in the current drawing color, the XOR color is used. If you draw over
an area that is not the current drawing color, then you will get an
unpredictable but reversible color: draw twice and the pixels revert back to
original values. Change to XOR mode with Graphics method: setXORMode( Color
XORColor ). Change to paint mode with Graphics method setPaintMode().
class XORMode extends Frame {
public XORMode ( int WidthInPixels, int heightInPixels ) {
setTitle( "XORMode" );
setSize( WidthInPixels, heightInPixels );
setLocation( 40, 40);
setBackground( Color.white);
show();
}
public void paint( Graphics display ) {
display.setColor( Color.darkGray );
int x = 10; int y = 10;
int width = 40; int height = 40;
int shift = width/2;
display.fillRect( x, y, width, height );
display.fillRect( x + shift, y + shift, width, height );
display.setXORMode( Color.green );
display.fillRect( x + 2*shift, y + 2*shift, width, height );
display.fillRect( x + 3*shift, y + 3*shift, width, height );
display.fillRect( x + 4*shift, y + 4*shift, width, height );
display.fillRect( x + 4*shift, y + 4*shift, width, height );
display.setPaintMode();
}
public static void main( String args[] ){
new XORMode( 150, 150 );
}
}
XORMode
Output
Clipping
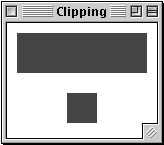
A
clipping area restricts the area in which drawing is done. This is useful when
updating just part of the drawing area. You can draw in the rest of the drawing
area, but it will not have any effect.
import
java.awt.*;
class Clipping extends Frame {
public Clipping ( int WidthInPixels, int heightInPixels ) {
setTitle( "Clipping" );
setSize( WidthInPixels, heightInPixels );
setLocation( 40, 40);
setBackground( Color.white);
show();
}
public void paint( Graphics display ) {
display.setColor( Color.darkGray );
int x = 10; int y = 10;
int width = 130; int height = 40;
display.fillRect( x, y, width, height );
int clipX = 60; int clipY = 60;
int clipWidth = 30; int clipHeight = 40;
display.setClip(clipX, clipY, clipWidth, clipHeight);
display.fillRect( x , y + 60, width, height );
}
public static void main( String args[] ){
new Clipping( 150, 100 );
}
}
Output
Printing
(JDK 1.1)
This
example shows how to print using the JDK 1.1. Printing in JDK 1.2 has been
changed some what. The steps to print.
First,
get a PrintJob object using: getToolkit().getPrintJob( theFrameToPrint, "Job
Title", aPropertiesObject ); where getToolKit() is a method in Frame's parent
class. The first argument is the frame to print. The second argument is the
name of the print job. The third argument is a properties object. The
preferences the user sets in the print dialog are stored in the properties. If
you pass the properties object to the print job a second time, the user's
settings are used in the print dialog. (This does not work with the Apple MRJ
2.1 early access 2 JVM.)
Second,
get a graphics object from the print job and draw on it.
Third,
call dispose on the graphics to "eject the page from the printer".
Fourth,
repeat the second and third steps for other pages.
Fifth,
call end() on the print job to end it.
class Printing extends Frame {
class PrintListener implements ActionListener {
public void actionPerformed( ActionEvent event ) {
PrintJob myPrint =
getToolkit().getPrintJob( Printing.this, "Sample Print", null );
if ( myPrint == null )
return;
Graphics printGraphics = myPrint.getGraphics();
if ( printGraphics == null )
return;
Printing.this.paint( printGraphics );
printGraphics.dispose(); //flush page
myPrint.end();
}
}
public Printing ( int WidthInPixels, int heightInPixels ) {
setTitle( "Printing" );
setSize( WidthInPixels, heightInPixels );
setLocation( 40, 40);
setBackground( Color.white);
setLayout( new FlowLayout() );
Button print = new Button( "Print" );
add( print );
print.addActionListener( new PrintListener() );
show();
}
Printing
Continued
public void paint( Graphics display ) {
int x = 10; int y = 50;
int width = 20; int height = 20;
display.fillRect( x, y, width, height );
display.drawString( "Hi Mom", 40, y );
}
public static void main( String args[] ){
new Printing( 150, 100 );
}
}
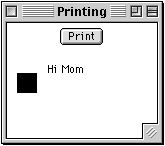
Since
the paint method only draws the black square and the text "Hi Mom" that is what
is printed.
Cursors
Types
of Cursors
| CROSSHAIR_CURSOR | NW_RESIZE_CURSOR |
| DEFAULT_CURSOR | S_RESIZE_CURSOR |
| E_RESIZE_CURSOR | SE_RESIZE_CURSOR |
| HAND_CURSOR | SW_RESIZE_CURSOR |
| MOVE_CURSOR | TEXT_CURSOR |
| N_RESIZE_CURSOR | W_RESIZE_CURSOR |
| NE_RESIZE_CURSOR | WAIT_CURSOR |
Cursor Example This example will cycle through all the different cursors. It displays the name of the cursor it is displaying. This example work with JDK 1.1. There is a shorter version of the program that works with JDK1.2.
import java.awt.*; import java.awt.event.ActionListener; import java.awt.event.ActionEvent; class CursorExample extends Frame { String cursorType = "Default Cursor"; public CursorExample ( int WidthInPixels, int heightInPixels ) { setTitle( "Cursors" ); setSize( WidthInPixels, heightInPixels ); setLayout( new FlowLayout() ); setLocation( 40, 40); Button next = new Button( "Next" ); setCursor( Cursor.DEFAULT_CURSOR); add( next ); next.addActionListener( new CursorListener() ); show(); } public void paint( Graphics display ) { display.drawString( cursorType, 10, 60 ); } public static void main( String args[] ){ new CursorExample( 150, 100 ); }
Cursor Example Continued class CursorListener implements ActionListener { int[] allCursors = { Cursor.DEFAULT_CURSOR, Cursor.CROSSHAIR_CURSOR, Cursor.TEXT_CURSOR, Cursor.WAIT_CURSOR, Cursor.SW_RESIZE_CURSOR, Cursor.SE_RESIZE_CURSOR, Cursor.NW_RESIZE_CURSOR, Cursor.NE_RESIZE_CURSOR, Cursor.N_RESIZE_CURSOR, Cursor.S_RESIZE_CURSOR, Cursor.W_RESIZE_CURSOR, Cursor.E_RESIZE_CURSOR, Cursor.HAND_CURSOR, Cursor.MOVE_CURSOR}; String[] description = { "Default Cursor" , "Crosshair Cursor" , "Text Cursor" , "Wait Cursor" , "Southwest Resize Cursor" , "Southeast Resize Cursor" , "Northwest Resize Cursor" , "Northeast Resize Cursor" , "North Resize Cursor" , "South Resize Cursor" , "West Resize Cursor" , "East Resize Cursor" , "Hand Cursor" , "Move Cursor" }; int cursorIndex = 0; public void actionPerformed( ActionEvent event ) { cursorIndex++; if ( cursorIndex >= allCursors.length ) cursorIndex = 0; CursorExample.this.setCursor( allCursors[ cursorIndex ] ); cursorType = description[ cursorIndex ]; repaint(); } } }Output
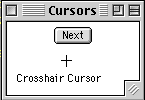
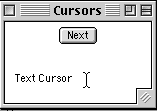
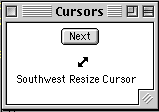
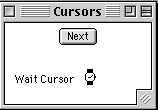 Note: cursors are platform dependent.
Copyright © 1998 SDSU & Roger Whitney, 5500 Campanile Drive, San Diego, CA 92182-7700 USA.
All rights reserved.
visitors since 18-Nov-98